So I'm getting rid of several old computers. Truth be told, they've been ready to be gotten rid of for awhile, but I've been dragging my feet on wiping them before handing them off. I remember this process being kind of a pain from the last time I got rid of a computer so I'm writing a post in the hopes that it makes the process more painless for someone else and for the next time I have to do this. There are tons of tutorials, but wouldn't it be easier if everything was in one place?
Basically, you'll be doing 6 things:
I) Back up your data
II) Prep to reinstall your operating system
III) Download and prepare to use the right software to wipe the drives
IV) Prepare to run a bootable USB
V) Wipe the drive
VI) Reinstall the operating system
Q: Does resetting my computer to factory settings wipe my drive?
A: Sorta. According to this website
When you factory restore a computer, you should expect a computer that functions like new – as long as none of the hardware is damaged. You won't have any access to old files and programs. While, for all intents and purposes, the memory is deleted, the old information may still be accessed by skilled professionals.Windows 8 and 8.1 both have better options for truly wiping a drive, but Windows 7 and below does not. And if I'm selling my laptop to someone, I'd rather be doubly careful so that's why I prefer to wipe it and then reinstall the OS.
I. Back up your data!
First, make sure you've backed up your data!
II. Prep to reinstall your operating system
Before you wipe your drive, make sure that you can reinstall your OS. You can do this one of two ways:
- you may use recovery disks* or
- download a legitimate copy of the OS somewhere and enter your OS key; to locate the key for your operating system, visit one of these options:
* also note that if your computer doesn't have a CD/DVD drive (as is the case for many smaller laptops these days), in order to use recovery disks, you will have to have either 1) an external CD/DVD drive or 2) put your recovery disks onto a bootable USB drive.
If you do NOT have recovery disks, you should create them during this step; otherwise, you won't be able to reinstall your OS!
III. Download and prepare to use the right software to wipe the drivesIf you do NOT have recovery disks, you should create them during this step; otherwise, you won't be able to reinstall your OS!
In this step you'll be downloading the program that you will actually use to wipe your drive (DBAN- Darik's Boot and Nuke). DBAN downloads as an ISO file and runs as a bootable program so in order to use it, you will have to either burn it to a disk to install it as a bootabable USB drive. Since I don't want to burn a disk, the steps below describe how to use DBAN installed on a bootable USB drive.
- download DBAN
- download Universal USB Installer - Once you've downloaded DBAN, you still have to turn the ISO into a either a bootable disk or bootable USB drive. The easiest way to create a bootable USB with DBAN is to use another the free software- Universal USB Installer
- Plug in the USB drive that you plan to put DBAN on
- Run Universal USB Installer and you'll be given options to install the DBAN ISO file to a USB drive (Install DBAN to bootable USB)
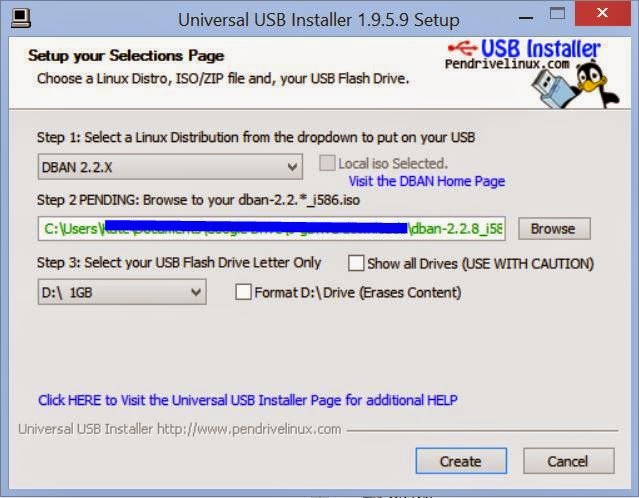

- When the program finishes running, remove the USB drive. Now you have a bootable USB with DBAN installed.
At this point you will have a bootable USB. Before you can run DBAN, you'll have tell your computer to bootup from the drive rather than its usual OS. In other words, this step is about telling your computer to not boot its usual OS and instead boot from your USB and entails two parts- 1) making sure the option to boot from USB is available and 2) choosing the USB to boot.
- Make sure the PC you want to wipe is turned off.
- Plug in the USB stick
- Boot the PC into the BIOS screen (PCs are different in how to get into the BIOS screen, but for many it's F2; for an Eee PC, you get to the BIOS by starting it and immediately pressing F2 like a mad person)
- Once in the BIOS, choose to the Boot menu

- In the Boot menu, make sure the following settings are selected:
- Bootabable drive: Enable
- Boot Booster: Disable
- Once the above settings are selected, hit F10, you'll get a popup that asks whether you want to save the settings and exit. When you choose OK, you'll let the computer know that one bootable drive option is a USB stick. Choose OK and go to the Boot menu to choose the USB.
- When you choose, Ok, the computer will reboot. As it reboots, immediately start hitting the Esc key to enter the Boot selection options menu so you can choose to reboot from the USB

- Choose USB as the drive to boot
This video walks you through everything I just wrote for booting up the USB drive.
V. Actually wiping the drive aka using DBAN
Finally, you're ready to run DBAN! Once DBAN boots, you get the following screen:

- I found it easiest to just use the autonuke function of DBAN, but there's a caveat-- if you use autonuke and leave the USB drive attached, DBAN will also erase the USB drive and you'll have to create a new bootable drive all over again. In order to prevent this from happening, after typing autonuke and hitting Return to run the command, the program begins running and a progress bar appears. Once the progress bar comes back with "...........ready." (this happens amazingly quickly so watch out!), remove the USB drive. Even without the USB drive, the program should keep running (in the above video, you can see this at timestamp 3:13-3:20) and now you can reuse the bootable USB drive.
You might also want to visit this tutorial for more detailed information.
This step assumes you have recovery disks or a bootable USB with your desired OS. After DBAN finishes, the OS will have been wiped from the computer. If you want to make the computer workable again, you'll need to reinstall the OS. If your OS was Windows, here's what you do-- depending on whether you have recovery disks are not.
I've found that it's easiest if you have an external CD/DVD drive AND recovery disks. In the case of my Eee PC, it was just a matter of a few steps:
- Attach CD/DVD drive
- Insert Eee PC support disc
- Enter Bios (see above) and make sure CD/DVD drive is an option for a bootable drive, F10 to save, Exit, and reboot
- Hit Esc during reboot to enter boot selection menu
- Choose the CD/DVD drive.
Some good articles:
No comments:
Post a Comment