Normally when you create a website in Google Sites, you’ll get a name such as these:
- (for Sites created in Google Apps): https://sites.google.com/a/YourDomainName.com/NewSiteName/
- (for Sites created in regular Google Sites): https://sites.google.com/site/NewSiteName/
- http://NewSiteName.MyDomainName.com/
There are two options for creating a Google Site:
- you may create a Google Site through Google Apps if you have an Apps account or
- you may create a site using regular Google Sites (https://www.google.com/sites/).
Step 1: Log into your Google Apps domain: https://apps.google.com/
Step 2: Choose Apps in the Admin Console Home page

Step 3: In the Apps dashboard, choose Apps

Step 4: Go to Google Sites dashboard
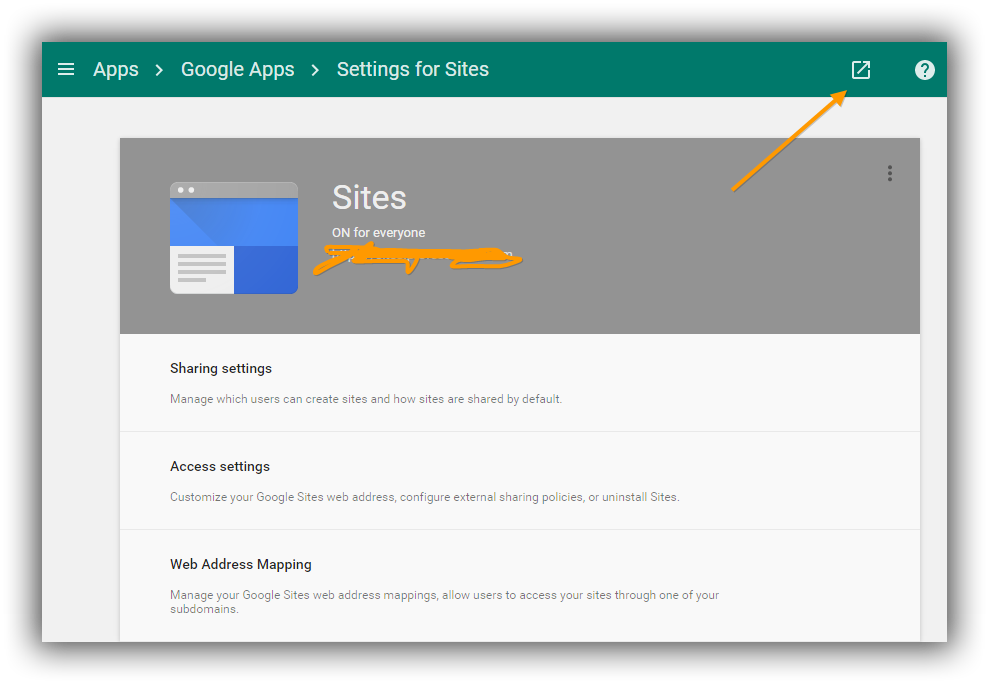
You’ll be taken the Google Apps dashboard. Choose Sites.

In the Settings for Sites dashboard, click the upper right button to go Google Sites for Google Apps.
Step 6: Create new Google Site
Click
 to create a new Google Site
Give your site the name you want. In the example here, I chose "test". The default url will
- https://sites.google.com/a/MyDomainName.com/test/
when you're ready and you'll be taken to your new site.
On your new site, go to the More button (#1) to open the menu and choose the "Manage site" (#2)

Step 9: Go to Web Address Mapping option
In the main "General" page, scroll down until you see “Web Address Mapping”

Step 10: Choose "Map this site and you’ll be taken to a screen that looks like this
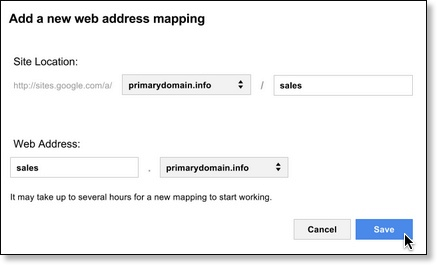
Step 11: Add the url name you want
For example, I want the default url to go from this: "https://sites.google.com/a/MyDomainName.com/test/"
to this: "http://test.MyDomainName.com"
Step 12: Changing the CNAME record verification page
Click Save and you’ll be returned to the Google Apps dashboard with a message to given a message titled "Changing the CNAME record"
Since this page usually asks for confirmation that you've completed the steps listed, I find it easier to open another instance of the Google Apps console in a new tab. Just open a new tab and type Google Apps. You may or may not need to log in again depending on how you're browser is configured.
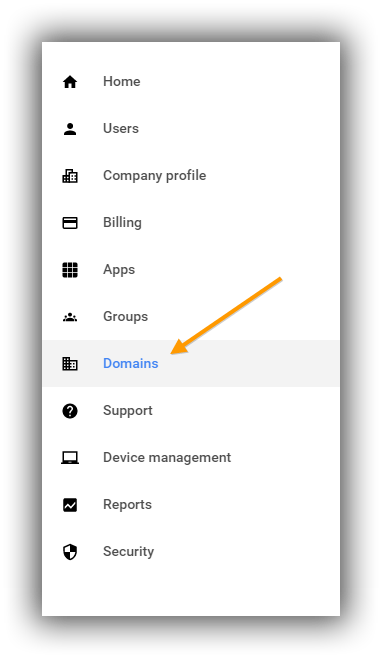
Step 13: Navigate to Domains tab in Google Apps
In the Google Apps console, click on the navigation expander again. and choose Domains
Step 14: Choose "Add/remove domains"
Then choose "Advanced DNS settings to see the login information for your domain.
Step 15: Log into your Domain Host using the login information provided in Step 13.
Step 16: Edit Host Records or DNS. In enom, it looks like this:
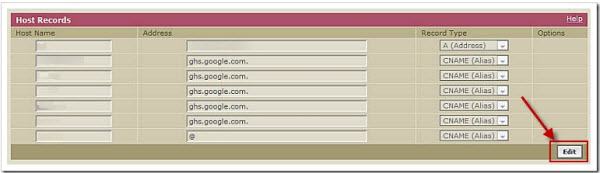
Click Edit and add the information that Google Sites gave you in the "Changing the CNAME record" page (see Step 12). Usually, it’s the following:
(Extra) Step 16.5: adding more mappings
I usually take one more step at this point and map one more url so if someone adds "www" in front of my domain, it will also go to the correct place. In other words, whether someone types "test.MyDomainName.com" or "www.test.MyDomainName.com", I want them to go the same site.
To do this, just repeat Step 16, but use "www.test" as the Host Name.
That's it! You should be set. If the changes are not immediate, give it about 1-2 hours. Now whenever someone types in “test.MyDomainName.com” or “www.test.MyDomainname.com”, they will go to the same website.
Click Save and you’ll be returned to the Google Apps dashboard with a message to given a message titled "Changing the CNAME record"
Since this page usually asks for confirmation that you've completed the steps listed, I find it easier to open another instance of the Google Apps console in a new tab. Just open a new tab and type Google Apps. You may or may not need to log in again depending on how you're browser is configured.
Step 13: Navigate to Domains tab in Google Apps
In the Google Apps console, click on the navigation expander again. and choose Domains
Step 14: Choose "Add/remove domains"
Then choose "Advanced DNS settings to see the login information for your domain.
Step 15: Log into your Domain Host using the login information provided in Step 13.
Step 16: Edit Host Records or DNS. In enom, it looks like this:
Click Edit and add the information that Google Sites gave you in the "Changing the CNAME record" page (see Step 12). Usually, it’s the following:
- Host Name: the name you want- in my case, it was “test”
- Address: ghs.googlehosted.com
- Record Type: choose CNAME (Alias)
(Extra) Step 16.5: adding more mappings
I usually take one more step at this point and map one more url so if someone adds "www" in front of my domain, it will also go to the correct place. In other words, whether someone types "test.MyDomainName.com" or "www.test.MyDomainName.com", I want them to go the same site.
To do this, just repeat Step 16, but use "www.test" as the Host Name.
- Host Name: www.test
- Address: ghs.googlehosted.com (or something along these lines)
- Record Type: choose CNAME (Alias)
Step 17: Verify CNAME record changes
Go back to the "Changing the CNAME record" page (see Step 12) and click "I've completed these steps"
No comments:
Post a Comment